
Targets You Can Download Click Link Below:

This is the first of a multi-part Guide to Field Target shooting
the beginner, who may have no knowledge of the sport, and moves steadily into the more expert aspects of Field Target (FT) shooting.

You recently received a new air rifle or have been plinking with your trusty old friend for years and want to try something different rather than shooting at paper or cans out in the backyard. But what else is there? Field Target shooting!
What is Field Target you ask? Field Target is a hunting simulation/airgun competition where you shoot at metal targets in the shapes of common small game quarry.
Below. A truck load of Field Targets.

First a little bit of history
Field Target was started in the UK in the early 1980s when a group of British airgun shooters got together in order to create a sport that simulated hunting with an airgun. The first targets were stationary metal animal silhouettes that were marked with orange stickers to represent a kill zone (KZ). The targets were shot then a judge would go and check to see if the target was hit in the KZ or not. A hit (X) was awarded for shots in the KZ while shots outside were recorded as a miss (O).
As the sport caught on and participation increased. The standard stationary silhouettes were replaced with a “fall when hit” (reactive) type of target. The shooter scored a hit (X) if the target fell or a (O) if the target stayed standing after the shot.
Current Field Targets are the fall when hit type and are reset by pulling a string that is attached to the face plate. The target’s face plates are mostly typical airgun quarry silhouettes but the sky’s the limit as far as creativity goes. You can see anything from simple shapes to big game quarry and everything in between!
Below, typical Field Targets showing the target mechanism.


What is Field Target you ask? Field Target is a hunting simulation/airgun competition where you shoot at metal targets in the shapes of common small game quarry.
Below. A truck load of Field Targets.

Field Target was started in the UK in the early 1980s when a group of British airgun shooters got together in order to create a sport that simulated hunting with an airgun. The first targets were stationary metal animal silhouettes that were marked with orange stickers to represent a kill zone (KZ). The targets were shot then a judge would go and check to see if the target was hit in the KZ or not. A hit (X) was awarded for shots in the KZ while shots outside were recorded as a miss (O).
As the sport caught on and participation increased. The standard stationary silhouettes were replaced with a “fall when hit” (reactive) type of target. The shooter scored a hit (X) if the target fell or a (O) if the target stayed standing after the shot.
Current Field Targets are the fall when hit type and are reset by pulling a string that is attached to the face plate. The target’s face plates are mostly typical airgun quarry silhouettes but the sky’s the limit as far as creativity goes. You can see anything from simple shapes to big game quarry and everything in between!
Below, typical Field Targets showing the target mechanism.


There are limits as to how far targets may be placed based on their KZ size.
In order to make the target fall, a shooter must estimate it’s range and make a clean hit on the paddle that sits behind the face plate. Hits on the edge of the KZ may or may not make the paddle fall. This type of shot is normally referred to as a split. If the majority of the pellet is inside of the KZ on a split, there may be enough of the pellet and energy remaining to knock the target down.
Totally opposite if the majority of the pellet hits mostly outside the KZ as illustrated below. The paddle may get marked by a piece of the pellet but there won’t be enough energy or pellet mass left to knock the target down.

Below, a target laying down after a clean hit was made.

So this intrigues you and you want to give Field Target a shot but what do you need to do to get prepared? Well, the best way to get prepared is show up to a match and learn as you go!
The usual monthly Field Target matches at the local club levels is usually a very relaxed atmosphere. Everyone will be willing to help you out and answer any questions you have. And by reading this Guide to Field Target Shooting, you’ll be well prepared, too.
But I don’t want to embarrass myself the first time out!
Well, we’ve all been there and have had our share of embarrassments. The best way to prepare is to learn/know your equipment. Will you clean the course your first time out……NO…….will you not hit anything…….NO. Most courses are set up with a variety that ranges from easy targets to difficult ones. There will be some you get without a problem, some you think you should have got and some that you will get eventually with practice!
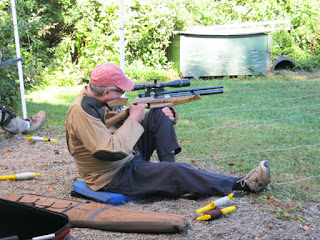
Below. Looking downrange at a typical Field Target shoot.

You will also want a scope that focuses down to close to 10 yards or below.
In order to determine the distance to the target, you use your scope to range find the distance to the target. No handheld laser range finders are allowed in any of the AAFTA divisions! (We’ll get in to the different AAFTA divisions in the future). Participants mark their scopes with yardage marks so that when the parallax wheel (side wheel) or adjustable objective (AO) is adjusted and the image is in focus the shooter knows the distance to the target.
Below is an example of a marked side wheel. The numbers indicate the range in yards for the airgun/pellet/scope combination in use.

Those shooting high magnifications in AAFTA’s Open or WFTF divisions may opt to mark every yard from 10 to 55.
When setting up a scope for Field Target shooting, I usually set a target at a known distance, mark my side wheel or AO and also take 5 or 6 shots at the target. By doing this, I am able to mark my scope and also determine my holdover/holdunder point or determine what number on the elevation turret I need to click to at that distance.
It takes time to get the scope set up the first time, but you only need to do it once – well once for each scope you’re using….
Next time we’ll continue our guide to Field Target shooting with the pre-first match setup. Then we’ll talk about how matches are run and touch on the different https://www.thebfta.net/
Field Target Shooting – Part Two

There are three divisions of Field Target shooting that are officially recognized by AAFTA. These divisions are Open, Hunter and WFTF. Each division has it’s own specific set of rules. Also, there has been a movement at the local level to offer a Freestyle/Unlimited Division where anything goes.
The easiest AAFTA division to start in is Hunter.
Hunter Field Target shooting is broken down into 2 classes, PCP (pre-charged pneumatic guns) and Piston (spring/piston or gas ram guns). As for scopes, the maximum magnification limit in Hunter is 12x. You can have a scope with a higher maximum magnification, but you must use 12X or below in order to compete. If your scope doesn’t have a factory 12x mark, you must use the next lowest factory mark.
Hunter division allows the use of shooting sticks and monopods for supporting the rifle but no attached bipods or tripods of any type. You may also use a seat (with no back or arms ) up to a maximum of 16-inches in height.
Below we see an example of a Hunter Division – PCP class setup.

In my last article I showed a picture of my marked side wheel and said I also shoot the targets as I marked the yardage on my wheel. After getting all the holdover/hold under marks jotted down on a piece of paper I then develop a range card to use during the match.
Here again is the example of my marked scope side wheel.


With this type setup, after the range is determined by adjusting the parallax (getting the target in focus) using the side wheel the shooter can read the yardage to the target then use his “range card” to determine the hold point.
For example: the card shown above shows the reticle is zeroed at 20 and 40 yards. If the target is ranged at 12 yards you would reference your “range card” and know that you’d hold 1 1/2 dots down below the centerline in order to make the shot. If the target was at 10 yards you’d hold 2 1/2 dots down. This is just one example of scope markings. There are plenty of ways to mark them, use what works best for you and your setup.

The terrain and layouts vary depending on the venue. Everything from wide open fields to tight shadowed forests and everything in between and beyond. Here are some typical Field Target shooting ranges.
Below. Field Target shooting


Matches usually last for 2 to 4 hours, depending on the number of shots and number of lanes. To begin with, the Match Director (MD) holds a shooters/safety/informational meeting prior to the start of the match. During this meeting the MD will layout all safety requirements, the time allowed per lane, the order that the targets are to be shot in, etc.
The order that the targets will be shot vary by venue, so please be sure to listen to the information provided by the MD. Any target not shot in order will result in a miss. For the most part, the target order falls into one of two categories, near to far or left to right.
Shooters are usually grouped in squads of 2 to 3 shooters. The time per lane is usually 1 minute for each shot plus 1 additional minute for setup.
What that means is that if the lane has 2 targets in it, each shooter would have 5 minutes to complete the lane. (Two shots per target x 2 targets would equal 4 minutes plus the 1 additional minute allowed for setup).
Again, this is NOT written in stone so pay attention at the shooters meeting for instructions. There are venues that only allow the 1 minute per shot and do not include the additional 1 minute for setup. Don’t be worried! Four shots in 4 minutes or 6 shots in 6 minutes is still plenty of time.
All courses usually contain at least 1 positional lane. For Hunter division shooters, you may shoot all the lanes using your seat and sticks EXCEPT when the lane is marked standing or kneeling. All shooters MUST shoot those lanes in the required positions. As a side note, a shooter may choose to shoot the kneeling lane standing (which is a harder position) if they are unable to kneel.
Below. A Forced Kneeling lane.

When you attend your first Field Target shooting match, you’re sure to look at all the other shooter’s equipment. But don’t be intimidated!
You will see everything from mild to WILD and all flavours in between. There have been plenty of matches from local monthly matches all the way up to the National level that have been won with mid-level, off the shelf equipment. Except for a match or two there are no big money prizes or high dollar sponsorships being handed out. Everyone is there to hone their skills and enjoy a day out with fellow airgun enthusiasts. It is almost always a very relaxed atmosphere.
Next time we’ll continue with a little bit more about the match, how it’s run and what to expect.
Field Target Shooting – Part Three

When you first arrive at the club for the day of the match, depending on the time you arrive you will more than likely encounter people running around making all the necessary last minute preparations for the match. Don’t be afraid to introduce yourself and offer any assistance. It is always greatly appreciated when you lend a helping hand. The Match Directors (MD) don’t do this for the money, they do it because the enjoy the sport!
Once the dust has settled from putting the final touches on the match prep, there is usually a sight-in range available and a registration table set up.
The sight-in period usually lasts for an hour or so. Take this time to run some shots through your rifle to make sure everything is where you think it should be. This is also a good time to converse with the other shooters. Again, much more often than not, the experienced shooters will willingly offer any advice and help that they can.
Below. A typical sight-in range and targets.


The registration info is used so that the MD can make up the squads for the day. Usually shooters shooting the same class are squadded together but shooters can request their partners for the day too. The MD will squad the new shooters with more experienced ones so they can help out the new shooters as needed.
There are 6 main classes for an AAFTA match. These include the divisions of Open, Hunter and WFTF which are then broken down into PCP or Piston class in each division. Depending on the participants for the day, the MD may do some consolidation to ensure that there are at least 3 shooters in each division.
After the registration and sight-in is completed, shooters usually jump in to lend a hand helping to tear down the sight-in range then make their way to the Field Target range.
Once at the Field Target range, shooters get situated and the MD starts the shooters meeting. When the shooters meeting is finished, the MD will assign the shooters their starting lane assignment and squad mates.
Lane layouts vary by location but always consist of lane markers and a shooting box. The rifles barrel must be between the lane markers and the shooter’s body must be behind them. As far as the course layouts go, it may be a walking path through the woods, in a line in an open field, under a covered range or whatever works best for the hosting venue.
Once the lanes are assigned the MD will call the line “Hot”. Shooters can then commence the match.


When you address a lane, make sure your equipment is set within your reach and that all the targets are pulled up and visible. The time allowed for each lane may vary and – if so – this will have been relayed to the competitors during the shooters meeting.
Lane time usually starts when the shooter sits down for a normal non-positional lane or when the shooter touches his/her rifle when at a positional lane. Any questions as to when the time starts or the target shooting order, ask your squad mates. They will be more than willing to help!
As stated previously, there will be 2 or 3 targets per lane with the shooter taking 2 shots at each target in the order and under the time limits that was set by the MD prior to the start of the match. Hits/knockdowns will be scored with an “X” while misses will be scored with a “O”. Shooters will shoot their lane and then continue on to the next one after all the shooters in their squad have completed that lane.
Below is a sample of a typical score card. Note that the shooters started on lane 9 and the target order for the match was 2 shots at the left target then 2 shots at the middle target then 2 shots at the right target. Also, note in this sample that the amount of targets per lane varied from 2 to 3.
Below. A typical scorecard.

There will probably be plenty of chatter going on during the match as everyone is there to shoot and enjoy the day. As soon as the shooter sits down, most of the chatter subsides. Depending on the closeness of the lanes you’ll probably be hearing things form the next lane or 2. Just be prepared and try to block out what you need to.
As you progress through your first match it will become apparent what things you’ll need to work on. There will be plenty of variation to test you as you go through the match.

Hopefully these first three articles have given you enough information as to what to expect for your first match. This is a sport for all ages and genders! We’ve seen shooters ranging in age from 8 to 80+ and all ages in between. Plenty of Husband/Wife, Grandfather/Grandson, Father/Daughter, etc. duos have participated too.
Look up a local Field Target event in your area and give it a try!
Guide to Field Target Shooting – Part Four
 This time around in my Guide to Field Target Shooting, I’m going to switch gears a little and give you a behind the scenes of what we do to get a field target match set up at BCSA
The first thing I do is determine a layout for the course. As Match Director, I try and make it fair for shooters of all skill levels. Nobody wants to go home without knocking down a single target!
There is usually a mixture of target difficulties ranging from easy to hard. This ensures that a novice will be able to score some knockdowns while still keeping it challenging for the veterans.
There are spreadsheets and loads of other information available on the https://www.thebfta.net/ website in order to help with creating a course layout.
Here is an example of a partial spreadsheet used for course planning:

The https://www.thebfta.net/ and website contains all the required information as to the maximums allowed for Field Target shooting. There are maxima for the difficulty of the individual targets, the entire match difficulty, maximum yardages allowed based on kill zone size and shooting position, etc. It’s a balancing act to set up a fair but challenging match.After I get the layout set to my liking, it’s now time to get the targets prepped for the match. It starts out with pulling the required targets off the shelf and getting them repainted. While I’m in the repainting phase, I perform any maintenance that is required. There is no greater disappointment than to have a target fail during a Field Target match!
Here is a picture of a few targets that were used in a previous match that need to be freshened up.
 Here are all the targets laid out in order of color that will be cleaned up, inspected and used for the next match in our Field Target shooting season.
 The first thing to do is get them spot sanded and prepped for paint. Once a year I strip the entire faceplate bare, but in between matches they just get the spot sand. After they are sanded, I inspect and test them to see if there are any issues and also test their function.
The 2 targets shown below were inspected and it was discovered that their paddles were caved in and they were starting to develop a few pinholes in them. This usually happens to the thinner factory paddles when the targets are placed at close distances. These paddles were replaced and now they are ready for service.
 I’m lucky enough to have plenty of slightly thicker paddles on hand to keep the targets running for years! They just need a little heat, a little twist and some paint and they’ll be ready to be installed.
 Here is a picture showing the spot sanded targets and my test pistol ready to do a function test. I perform the preliminary testing prior to repainting. That way, if there is an issue I can correct it and retest without having to repaint.
 In order to ensure that the target is functioning properly, I will shoot the paddle at point blank range with the pistol shown above. I know how many pumps it takes to produce 3 Ft/Lbs of muzzle energy using the pellets shown.
If the target doesn’t fall when tested, they are investigated and any problems are corrected. I also shoot them at 10 yards with a 22 Ft/Lb (at the muzzle) .22 caliber rifle to make sure that they don’t fall down. After the knockdown tests have been completed it’s on to painting.
Targets tested, repaired, primed and ready for paint!
 As you can see above, I’ve replaced a lot of the original face plates with aftermarket ones that are quite a bit thicker and more durable. The targets that retain the original faceplates are usually set at the longer distances to help alleviate damage.
After a repaint, I usually take a paint pen and add a little bit of detail to the targets. Below is the finished product ready for action.
 Once the course layout has been determined and the targets have all been repaired and repainted we are ready to set up for match day!
We usually set out our targets for the match the day before. Targets are placed at their predetermined distances and leveled in order to ensure proper function.
This target is being placed at 51 yards from the firing line to the faceplate.
 Here is a target been levelled in both directions. A target of this type that isn't levelled (or close to level) has a higher chance of not working correctly come match time.
 If there is a major threat of inclement weather for match day, I will cancel a match. But, if the weather happens during match setup, we soldier through. Field Target is a tough sport!
 This time around it was raining pretty good while we were setting up the course. (This is The UK, after all). All the targets were lubed, but I thought it was a good idea to cover them for the night to keep the rain off of them the best I could.
 Come match day, we do the final odds and ends on the field target range. In the case shown above, it was unbagging targets and pulling all the reset strings. After the Field Target range was all set, it was on to setup the sight in range.
The sight in targets are placed and measured so that the competitors have an accurate distance in order to verify their equipment.
 Early arrivals (like Art shown below) jump in and lend a helping hand in order to complete the setup for the day’s match.
 What makes all this work worthwhile you ask?
The fact that after all this work, the outcome is people of all backgrounds and ages coming together for a day of fun and camaraderie on the Field Target range! All there to challenge themselves, better themselves and share the day and their knowledge with like minded shooters…
Guide to Field Target Shooting – Part Five
In earlier articles, we discussed what it takes to get started in Field Target in BFTA Hunter Division
You may ask “Are there other Divisions I can shoot in without sticks and use a higher scope magnification?” Why, yes you can!
This time I’ll give you a little taste of the other BFTA Hunter Division that are available BFTA Open Division and WFTF Division (World Field Target Federation). AAFTA is the governing body for Field Target in the U.S. while the World Field Target Federation governs the World Championships.
Below are a couple of pictures, one showing a shooter shooting Open Division Piston Class and another shooter shooting WFTF Division Piston Class. Can you determine which shooter is shooting Open and which is shooting WFTF?
 Above: Photo 1.Below: Photo 2.
 How about the following pictures one showing an Open Division PCP Class shooter and the other showing a WFTF Division PCP Class shooter? Can you figure out which shooter is shooting which division?
 Above: Photo 3.Below: Photo 4.
 The answer is that, in both of the cases above, the shooters in the top pictures are shooting WFTF Division. That’s Photos 1 and 3. The shooters in photos 2 and 4 are shooting Open Division.
What’s the difference you ask? Well, all the shooters in both divisions can sit on a seat no higher than 6-inches and are allowed to use unlimited scope magnification. One of the main differences between the two Divisions is the power level their rifles are shooting at.
WFTF Division allows for a maximum 12 Ft/Lbs of energy at the muzzle, while Open Division shooters can go up to a maximum of 20 Ft/Lbs of energy at the muzzle.
Another difference between the two Field Target divisions shown in the above photos relates to support for the air rifle.
The Open Division PCP shooter in Photo 4 is using a harness or straps as a support whereas that type of support is not allowed per WFTF rules. The WFTF rules also prohibits the use of a thigh rest which is allowed per AAFTA’s Open Division rules.
And then there’s scopes!
All the individuals shown above are allowed to use unlimited scope magnification. But those shooting in AAFTA’s Hunter Division are limited to 12x or the next lowest factory setting as discussed previously.
Open Division and WFTF Division shooters are also allowed to adjust their scopes for both elevation and windage any time during the match as they see fit.
Most, if not all shooters, don’t adjust windage during the match unless they know they are having an issue that needs to be corrected. Once they have verified their settings at either their practice range or at the sight-in range prior to the match, there really should be no reason to touch the windage knob.
As I have shown and discussed a little in my previous articles on Field Target Shooting, a Hunter Division shooter is not allowed to adjust their scope after the match starts and uses hold-over once they determine the targets distance.
 Above. Example of a marked side wheel.
Below. Holdover/hold under “range card”. (Note: the horizontal lines between the dots are for the user’s reference. The scope has
Mil-dots only.)
 In both the Open Division and WFTF, shooters are allowed to determine the distance to the target by adjusting their scope’s parallax. After that distance has been determined, they are allowed to adjust their elevation or windage knobs.
Below is an example showing that a shooter has determined the distance to the target as being 45 yards. This example shows a “front AO” scope.
 Once the distance to the target is determined to be 45 yards, the shooter then adjusts their elevation knob to 45 as shown below.
 Being able to adjust your scope’s elevation knob allows the shooter to hold on their horizontal crosshair line. This means you do not have to deal with the “hold over” and or “hold under” that Hunter Division shooters have to deal with.
Depending on the power level the shooter is shooting at and the wind during the match the shooter may have to hold outside the Kill Zone (KZ) in order to make the shot. There have been times at Field Target matches where I have heard WFTF shooters saying that they had to hold outside of the KZ by up to 4-inches or more!
It is definitely nicer to be able to hold one reference point (the horizontal crosshair) then hold off as the shooter sees fit rather than to have to float the KZ somewhere out in space and try to reference both the vertical and horizontal crosshairs at the same time!
You would think that all shooters in Open and WFTF adjust their elevation knobs BUT you would be incorrect.
There are some excellent shooters in both Field Target Divisions that don’t click and still use hold over/ hold under. Here’s the reason. Depending on the power level you are shooting at and the height of your scope, you may have to make more then one revolution in order to cover all the target distances from 10 yards to 55 yards! By not adjusting your elevation knob you are less likely to get out a complete revolution on your knob.
There have been plenty of times where shooters missed a target due to being one full rotation out from where they should have been. Hold over / hold under alleviates this from happening. The choice is yours…
I have only touched on some of the basic rule differences between the two Divisions.
To see the complete set of rules be sure to check out the most current version of the BFTA Handbook
When viewing the WFTF Division rules in the AAFTA Handbook, be sure to click on the link to the WFTF rules where you will find more information on the WFTF’s core and comprehensive rules.
As you can see, with the two Divisions discussed in this article plus the Hunter Division I previously discussed, there is a place for everyone! Look for a Field Target match in your area, grab your rifle and join in the fun!
Here is a picture of a few targets that were used in a previous match that need to be freshened up.


The 2 targets shown below were inspected and it was discovered that their paddles were caved in and they were starting to develop a few pinholes in them. This usually happens to the thinner factory paddles when the targets are placed at close distances. These paddles were replaced and now they are ready for service.


If the target doesn’t fall when tested, they are investigated and any problems are corrected. I also shoot them at 10 yards with a 22 Ft/Lb (at the muzzle) .22 caliber rifle to make sure that they don’t fall down. After the knockdown tests have been completed it’s on to painting.
Targets tested, repaired, primed and ready for paint!

After a repaint, I usually take a paint pen and add a little bit of detail to the targets. Below is the finished product ready for action.

We usually set out our targets for the match the day before. Targets are placed at their predetermined distances and leveled in order to ensure proper function.
This target is being placed at 51 yards from the firing line to the faceplate.


The sight in targets are placed and measured so that the competitors have an accurate distance in order to verify their equipment.


The fact that after all this work, the outcome is people of all backgrounds and ages coming together for a day of fun and camaraderie on the Field Target range! All there to challenge themselves, better themselves and share the day and their knowledge with like minded shooters…
Guide to Field Target Shooting – Part Five

In earlier articles, we discussed what it takes to get started in Field Target in BFTA Hunter Division
You may ask “Are there other Divisions I can shoot in without sticks and use a higher scope magnification?” Why, yes you can!
This time I’ll give you a little taste of the other BFTA Hunter Division that are available BFTA Open Division and WFTF Division (World Field Target Federation). AAFTA is the governing body for Field Target in the U.S. while the World Field Target Federation governs the World Championships.
Below are a couple of pictures, one showing a shooter shooting Open Division Piston Class and another shooter shooting WFTF Division Piston Class. Can you determine which shooter is shooting Open and which is shooting WFTF?


What’s the difference you ask? Well, all the shooters in both divisions can sit on a seat no higher than 6-inches and are allowed to use unlimited scope magnification. One of the main differences between the two Divisions is the power level their rifles are shooting at.
WFTF Division allows for a maximum 12 Ft/Lbs of energy at the muzzle, while Open Division shooters can go up to a maximum of 20 Ft/Lbs of energy at the muzzle.
Another difference between the two Field Target divisions shown in the above photos relates to support for the air rifle.
The Open Division PCP shooter in Photo 4 is using a harness or straps as a support whereas that type of support is not allowed per WFTF rules. The WFTF rules also prohibits the use of a thigh rest which is allowed per AAFTA’s Open Division rules.
And then there’s scopes!
All the individuals shown above are allowed to use unlimited scope magnification. But those shooting in AAFTA’s Hunter Division are limited to 12x or the next lowest factory setting as discussed previously.
Open Division and WFTF Division shooters are also allowed to adjust their scopes for both elevation and windage any time during the match as they see fit.
Most, if not all shooters, don’t adjust windage during the match unless they know they are having an issue that needs to be corrected. Once they have verified their settings at either their practice range or at the sight-in range prior to the match, there really should be no reason to touch the windage knob.
As I have shown and discussed a little in my previous articles on Field Target Shooting, a Hunter Division shooter is not allowed to adjust their scope after the match starts and uses hold-over once they determine the targets distance.

Below. Holdover/hold under “range card”. (Note: the horizontal lines between the dots are for the user’s reference. The scope has
Mil-dots only.)

Below is an example showing that a shooter has determined the distance to the target as being 45 yards. This example shows a “front AO” scope.


Depending on the power level the shooter is shooting at and the wind during the match the shooter may have to hold outside the Kill Zone (KZ) in order to make the shot. There have been times at Field Target matches where I have heard WFTF shooters saying that they had to hold outside of the KZ by up to 4-inches or more!
It is definitely nicer to be able to hold one reference point (the horizontal crosshair) then hold off as the shooter sees fit rather than to have to float the KZ somewhere out in space and try to reference both the vertical and horizontal crosshairs at the same time!
You would think that all shooters in Open and WFTF adjust their elevation knobs BUT you would be incorrect.
There are some excellent shooters in both Field Target Divisions that don’t click and still use hold over/ hold under. Here’s the reason. Depending on the power level you are shooting at and the height of your scope, you may have to make more then one revolution in order to cover all the target distances from 10 yards to 55 yards! By not adjusting your elevation knob you are less likely to get out a complete revolution on your knob.
There have been plenty of times where shooters missed a target due to being one full rotation out from where they should have been. Hold over / hold under alleviates this from happening. The choice is yours…
I have only touched on some of the basic rule differences between the two Divisions.
To see the complete set of rules be sure to check out the most current version of the BFTA Handbook
When viewing the WFTF Division rules in the AAFTA Handbook, be sure to click on the link to the WFTF rules where you will find more information on the WFTF’s core and comprehensive rules.
As you can see, with the two Divisions discussed in this article plus the Hunter Division I previously discussed, there is a place for everyone! Look for a Field Target match in your area, grab your rifle and join in the fun!
No comments:
Post a Comment
Note: only a member of this blog may post a comment.